
I've watched guys spend good money on a CB radio and blow the finals in two weeks because they skipped the antenna tuning. It's not complicated to set up a CB radio in a semi truck correctly, but there's an order to it. Get the order wrong and you're either buying a new radio or wondering why nobody can hear you past a mile. I've done this install a dozen times across different rigs -- a Kenworth T680, two Peterbilts, and an older Freightliner Classic that took some creativity to wire. The steps here work on any Class 8 truck. Follow them in sequence and you'll have a properly working setup the first time.
The radio I'm running now and the one I recommend to any driver who asks is the Uniden BEARCAT 980. It's a 40-channel SSB radio with a backlit display, NOAA weather scan, and a noise-canceling mic that actually does something. I've had it in my Peterbilt 389 for going on two years. But a good radio only works if your antenna and coax are set up right. So let's go through it from the beginning.
Running a bad SWR will fry your radio's finals -- here's the radio that's worth protecting.
The Uniden BEARCAT 980 is a 40-channel SSB CB with NOAA weather scan, a 7-color display, and a noise-canceling mic. It's what I've been running for two years without issues. Get the right radio before you start the install.
Amazon Check Today's Price on Amazon →Step 1: Pick the Right Radio and Antenna Combo
The radio and antenna are a system. You don't pick them separately. Before you mount anything, decide what you need. For OTR work, you want at minimum a 40-channel AM radio. If you run the interstates in the Midwest and Southwest, where skip propagation is a daily reality, SSB sideband matters a lot -- it cuts through the interference that makes a standard AM radio sound like static soup from 200 miles away. The Uniden BEARCAT 980 handles both AM and SSB, which is why I went with it over cheaper options.
For antennas, the most common setup on a Class 8 truck is a single fiberglass whip, typically 4 feet long, on a mirror mount. Some owner-operators run dual co-phase antennas -- one on each mirror -- for better broadcast pattern and range. Dual co-phase sounds better on paper, but the coax phasing harness has to be tuned correctly or it actually makes things worse. If this is your first install, start with a quality single antenna like a Firestik or Wilson 1000. Get that dialed in, then experiment with dual co-phase later if you want to.
What you need for this install: the CB radio, an antenna (4-foot fiberglass whip recommended), a mirror mount or hatch mount bracket, 18 feet of RG-58A/U coax cable with PL-259 connectors on each end, an SWR meter, and a short 3-foot jumper cable to connect the meter. Do not skip the SWR meter. It costs about $15 and it protects a radio that costs ten times that.
Step 2: Choose Your Mounting Location for the Radio
Most guys mount the radio under the dash on the driver's side, within easy reach. You can buy universal radio mounts that bolt to existing holes or clamp to a roll bar if your cab has one. In a Peterbilt 389 or 388, there's usually a flat surface to the right of the steering column that works well. Kenworth T680 and T880 cabs are tighter up front -- some guys use a console mount between the seats so the radio doesn't interfere with the display cluster.
Wherever you mount it, check three things first. One: the radio won't block your view of any gauges or switches you need to reach while driving. Two: the mic cord can reach the mic clip and the radio without pulling tight. Three: you have a clean path to run the coax from the radio to the antenna without bending it at sharp angles -- coax doesn't like sharp bends. A good mounting bracket puts the radio face at a slight upward angle so you can read the channel display without looking straight down.
Step 3: Wire the Power
A CB radio draws very little current -- the BEARCAT 980 pulls about 1.5 amps receive and 4 amps transmit. You have two clean options for power. The easiest is the cigarette lighter or 12V accessory socket if it's a switched circuit (meaning it only has power when the key is on). Some 12V sockets in trucks are always-on, which means the radio will drain your battery if you forget it's on. Check with a test light before you use that socket.
The cleaner option, and the one I use, is to run a fused direct wire to the battery or to a switched fuse block behind the dash. Use 16-gauge wire minimum, add a 5-amp inline fuse within 18 inches of the power source, and connect black to chassis ground at a clean bolt. A bad ground is the number one cause of engine-noise interference in a CB -- you'll hear a whine that changes pitch with your RPMs. If you hear that whine, your ground isn't clean. Find a better bolt.
A bad ground is the number one cause of engine whine in a CB. If you hear RPM-pitch noise in your audio, don't touch the radio -- find a better ground bolt first.

Step 4: Mount the Antenna
Mirror mounts are the standard on semi trucks for good reason. They clamp to the existing mirror arm with two U-bolts, they're solid at highway speeds, and they put the antenna high enough to get a clean signal. Buy a mirror mount rated for 3/8-24 thread, which is the standard antenna base thread. Your Firestik or Wilson antenna screws right onto it.
Driver-side mounting is most common. Passenger-side works too, and if you're running dual antennas you'll have one on each side. When you tighten the U-bolts, get them snug but not torqued down like a lug nut -- you don't want to crack the mirror housing. The antenna should stand straight up with zero wobble. If it wobbles at all when you shake it by hand, tighten the mount more or add a lock washer. A loose antenna affects SWR readings and will give you different readings every time you check.
Some drivers, especially on sleeper cabs with an extended roof fairing, prefer a roof or hatch mount at the back of the cab. This works fine, but runs more coax and makes it harder to tune the antenna's tip. Mirror mount is simpler for most installs.
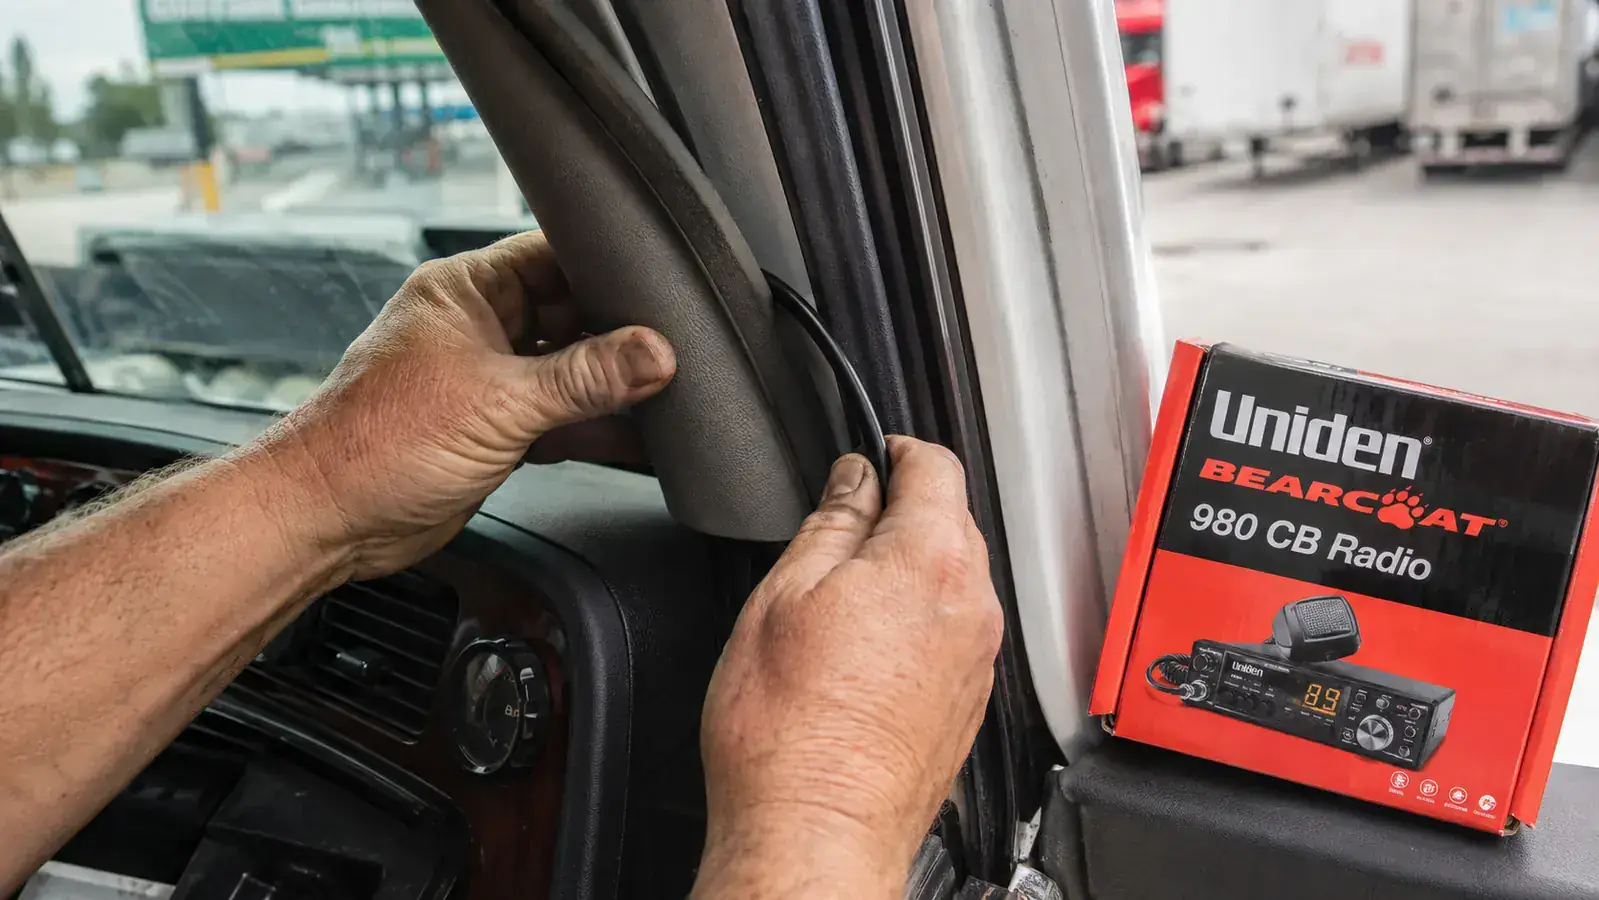
Step 5: Route the Coax Cable
Run the coax from the antenna down the mirror arm and into the cab. Most trucks have a rubber grommet where the mirror wiring passes through the door frame or A-pillar -- you can often feed the coax PL-259 connector through the same hole if there's room, or drill a new small hole and add your own grommet. Never run coax through a bare metal hole without a grommet. The insulation will wear through over time from vibration and you'll get a short.
Inside the cab, run the coax along the A-pillar and under the dash trim. Use cable clips or adhesive-backed wire holders to keep it tidy. Do not coil up excess coax under the seat or zip-tie it into a tight loop -- extra coax length creates capacitance that throws off your SWR. If your run is shorter than your cable, cut the cable and re-terminate it, or buy a shorter cable to begin with. Most installs in a Class 8 cab need 15 to 18 feet from antenna to radio. Plan your cable length before you buy.
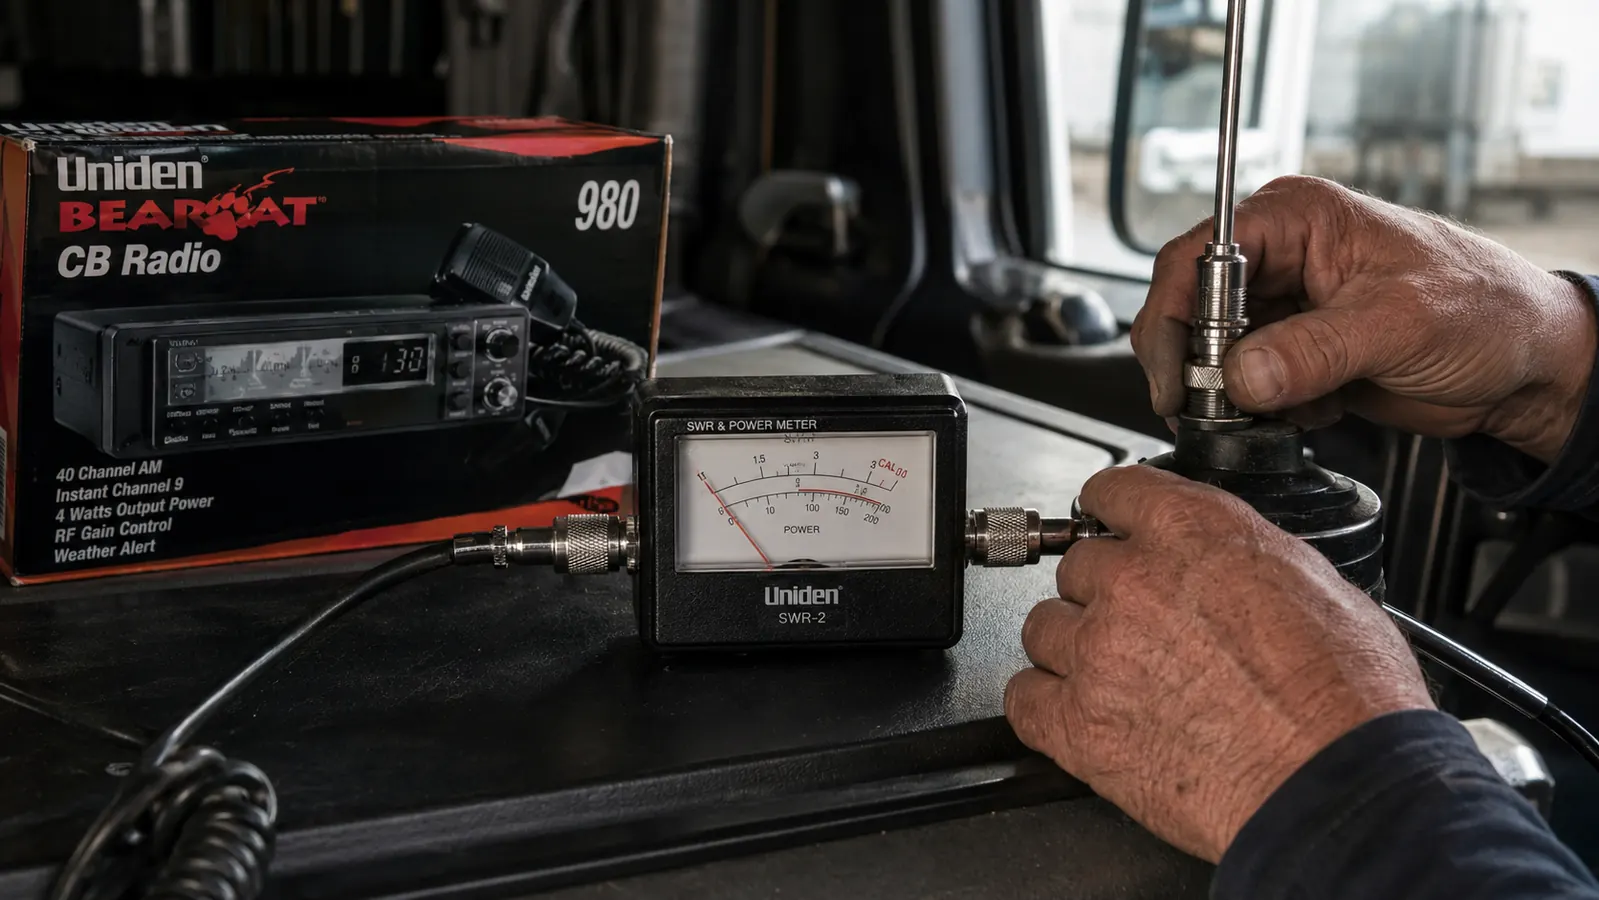
Step 6: Tune SWR Before You Transmit
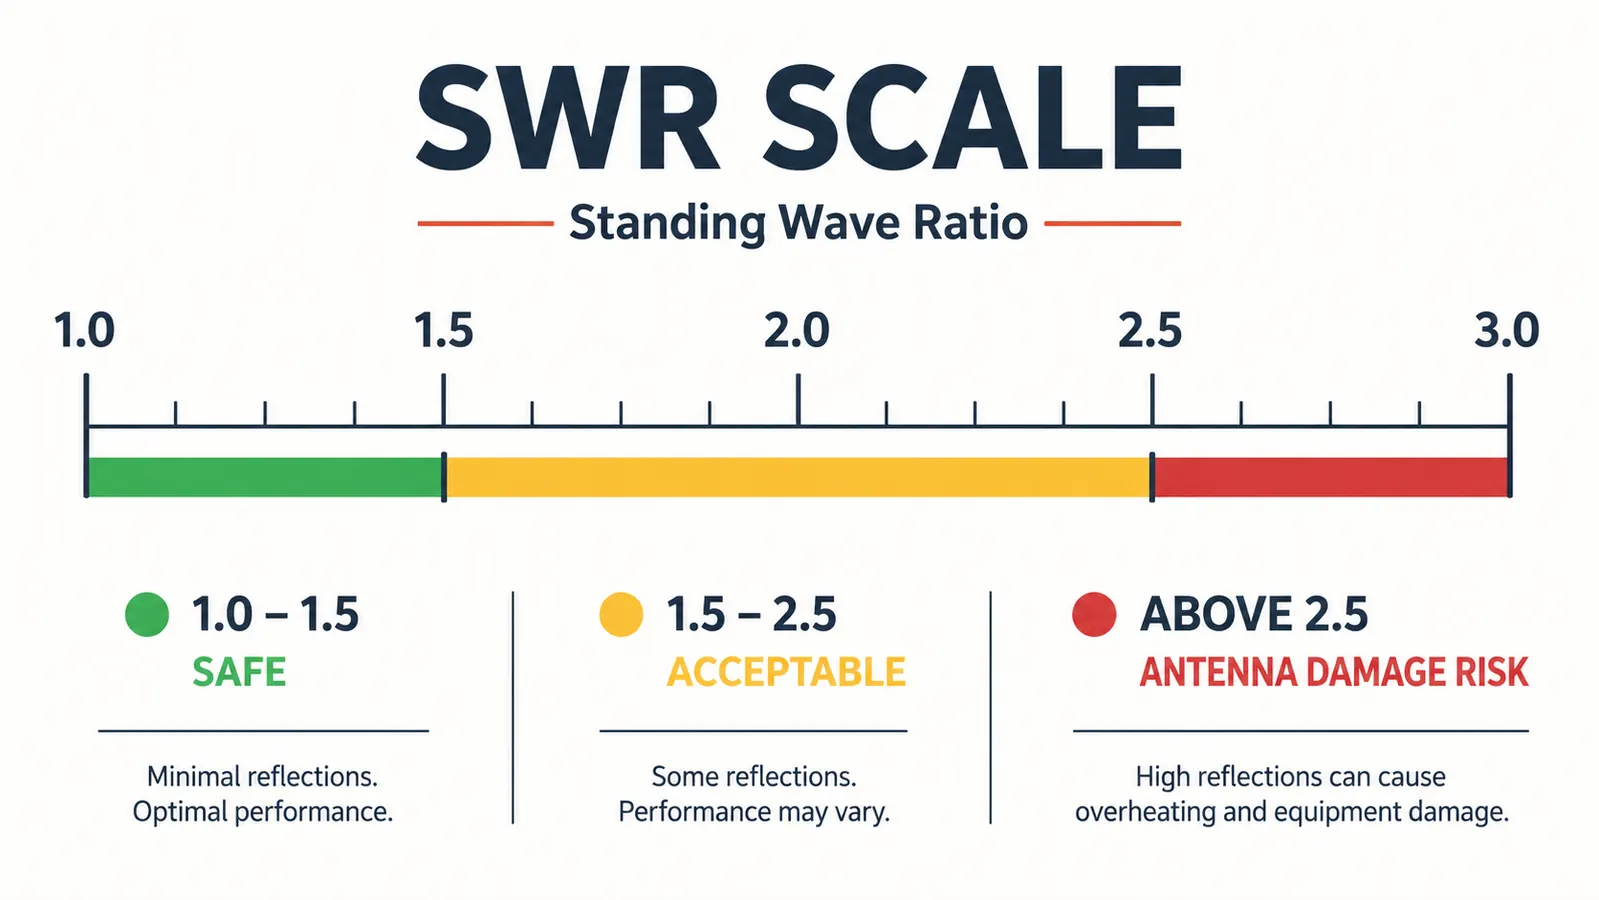
This is the step most people skip and the one that matters most. SWR stands for standing wave ratio. It measures how efficiently your antenna is radiating the power your radio is sending. A perfect antenna is 1.0:1 -- all power radiated, nothing reflected back. In practice, 1.5:1 or lower is excellent. Above 2.0:1 you're wasting transmit power. Above 3.0:1 you're actively damaging the output transistors in your radio every time you key up. Key up repeatedly at SWR 3.0 or higher and you will kill that radio.
To tune SWR: connect your SWR meter inline between the radio and the antenna coax. Use the short jumper cable -- radio output to SWR meter input, SWR meter output to your main coax. Most SWR meters have a forward/reflect switch and a calibration knob. Set it to forward, key up briefly, turn the calibration knob until the needle hits the CAL mark, then flip to reflect and read the SWR. Do this on channel 1 and again on channel 40. Write down both readings.
If your SWR is higher on channel 1 than channel 40, your antenna is too short -- screw the tip out slightly. If it's higher on 40 than on 1, the antenna is too long -- screw the tip in. Adjust in small increments, checking SWR after each change. The goal is to get both channel 1 and channel 40 below 2.0:1, with channel 19 as low as possible. Most quality antennas will tune down to 1.2:1 or better with patience. Once you're done, remove the SWR meter, reconnect the coax directly to the radio, and you're ready to key up.
What Else Helps
Once you're on the air with a properly tuned setup, a few other things are worth knowing. Channel 19 is the standard channel for truckers on US highways -- that's where traffic, scale info, and general driver-to-driver talk happens. Channel 17 is used on I-10 and parts of the Southwest. Channel 9 is the FCC-designated emergency channel; some drivers monitor it but most traffic has moved to cell phones. Keep your squelch set just above the static noise floor so you're not listening to hiss all day but you still catch transmissions.
On courtesy: keep transmissions short and listen before you key up. If someone is already talking, wait for a break. Don't run your CB on high power in a truck stop where radios are close together -- it just creates interference for everyone around you. And if you're running SSB on the BEARCAT 980, remember that sideband is upper and lower sideband above and below channel 40 -- it's a different world from AM channels, with its own etiquette. Most sideband traffic is on USB (upper sideband) in the US.
If you want more detail on whether the BEARCAT 980 is the right radio for your setup, including how SSB performs on the interstates versus a basic AM-only unit, read my full review at the link below.
Once your SWR is below 1.5 on channel 19 and you've got a clean ground, the radio will take care of itself. I've run the BEARCAT 980 for two years in a Peterbilt 389 with no issues.
Ready to install? The BEARCAT 980 is the radio this whole guide was written around.
40-channel SSB, NOAA weather scan, 7-color backlit display, noise-canceling mic. It's worth installing correctly -- and with the steps above, you've got everything you need to do it right the first time.
Amazon Check Today's Price on Amazon →